Before we start, realize that once your Navbar is disabled, you will have to get to your control panel (Dashboard) by clicking on the edit pencil of any post.
When the post window appears, your navbar will show the Dashboard link in the upper right blue area, just like before.
But for now, go to "Create" in the upper left beige bar. It will take you to an empty posting window and below that will be the blue link that says "Return to list of posts". Through this link you will be able to get to any unpublished stored posts or edit any existing posts.
Later, you will be able to install a "search this blog" widget if you found that feature of the navbar useful for your blog. I will show you how to do it in a future post.
You will still even be able to flag blogs if you happen to run across an objectionable blogspot blog, even if they have their navbar disabled! I will also describe that process in a future post.
In other words, you will not loose any important capabilities by disabling the navbar, only the ability to navigate through blogs via "Next Blog".
So now, let's get started to disable the navbar and keep those nasty blogs from landing in our lap.
First, click on an edit pencil or go to Dashboard and then the "Customize" link that is in upper left-hand bar of the Dashboard page.
We want to get to the "Template" tab. You will see the Page Elements page as pictured below.
From here you will click on "Edit HTML".
Template page: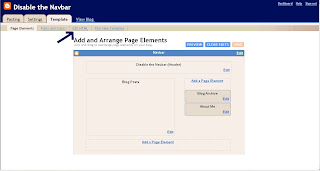.jpg)
Below is the "Edit HTML" page. But first, for safety, click on the "download full template" button and save it in your computer as you are prompted. Call it something like, myblognamePREnavbardisable.html (or.xml whatever your program allows.)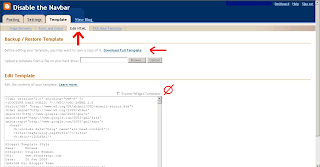.jpg)
Now, this is the piece of code that you will be entering that will hide the navbar:
#navbar-iframe {height:0px;visibility:hidden;display:none}
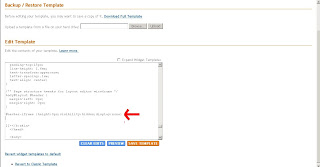
Below are two snapshots of the page showing where the code will go.
The red arrow points to the code that you will be inserting.
You can copy and paste it into the proper position.
To get to the proper position in the existing template code, you must scroll down the window that contains the code without expanding the widgets. (Don't check the "expand widgets box")
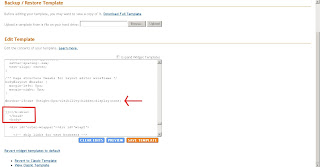
You will scroll about 4/5 the way down until you see the cluster of tags that I have squared off in red. These are part of the code already in your template.
Look closely for them as you scroll. When you find them, insert your magic line of code just above the /b:skin
.jpg)
.jpg)
Now click "Save Template". Once again, you should "download full template" and save it in the same place on your computer that you saved the first template download. You should name it the same except with AFTERnavbardisable in the title.
Publish and view your blog. Your navbar is gone!! Now you can safely have your kids and friends visit your great labor of love.
Happy blogging!
First, click on an edit pencil or go to Dashboard and then the "Customize" link that is in upper left-hand bar of the Dashboard page.
We want to get to the "Template" tab. You will see the Page Elements page as pictured below.
From here you will click on "Edit HTML".
Template page:
.jpg)
Below is the "Edit HTML" page. But first, for safety, click on the "download full template" button and save it in your computer as you are prompted. Call it something like, myblognamePREnavbardisable.html (or.xml whatever your program allows.)
.jpg)
Now, this is the piece of code that you will be entering that will hide the navbar:
#navbar-iframe {height:0px;visibility:hidden;display:none}
Below are two snapshots of the page showing where the code will go.
The red arrow points to the code that you will be inserting.
You can copy and paste it into the proper position.
To get to the proper position in the existing template code, you must scroll down the window that contains the code without expanding the widgets. (Don't check the "expand widgets box")
You will scroll about 4/5 the way down until you see the cluster of tags that I have squared off in red. These are part of the code already in your template.
Look closely for them as you scroll. When you find them, insert your magic line of code just above the /b:skin
.jpg)
.jpg)
Now click "Save Template". Once again, you should "download full template" and save it in the same place on your computer that you saved the first template download. You should name it the same except with AFTERnavbardisable in the title.
Publish and view your blog. Your navbar is gone!! Now you can safely have your kids and friends visit your great labor of love.
Happy blogging!
No comments:
Post a Comment