When you switch to another blog platform, like WordPress be careful not to delete your blog as the url will then be grabbed by a sporn site, especially if you had lots of traffic. You will be quite embarrased when your loyal following stops by for a visit.
Keep the old blogger site and advise people that you are no longer there and create a link to your new location.
You may also want to use it as an archive storage site.
I would start a NEW, fresh blog at wordpress.com and use Blogger as storage, creating links at wordpress to your old posts on Blogger.
I recently transferred a blog to wordpress.com and it worked very well. All posts and pictures transferred without nary a hitch. And the original blogspot blogger blog stayed intact. Remember to go to wordpress.com, if you want a FREE blog, not wordpress.org.
You will not be able to use google adsense over there.
Don't forget that when you write your blog you should SAVE each post with pictures (or address/name/file location in your harddrive). Make a file with documents of each blog post, in case your blog should ever be lost. The info is not floating in space somewhere, it is actually located in a large computer and that computer (server) could loose power, the owners of the storage space could delete it for some reason or it could be taken over by terrorists (just a little humor).
Your other option is to buy a domain name and get a hosting package and have the domain name point to your Blogger site (~$150/year). You can then remove any "I Power Blogger" advertising and disable the Navbar without violation.
If you want a truly anonymous site you must get an anonymous registration from godaddy hosting service. Network solutions will always publish the registrants name but you can get your address and contact info privatized for a yearly fee (~$12). Otherwise, people will find out your full name and where you live just by putting your url into the "whois" search.
Once you buy a hosting package, it cannot be switched over to an anonymous agent. At least it can't at network solutions. But I don't think their helpdesk people understood my question.
If you have any questions I will post them in a FAQ sidebar without any personal identification. Just put "sidebar this" in your comment.
I know it's work, but you love it, don't you?
Happy blogging!
Saturday, August 25, 2007
Friday, August 24, 2007
Disable the Navbar.
Before we start, realize that once your Navbar is disabled, you will have to get to your control panel (Dashboard) by clicking on the edit pencil of any post.
When the post window appears, your navbar will show the Dashboard link in the upper right blue area, just like before.
But for now, go to "Create" in the upper left beige bar. It will take you to an empty posting window and below that will be the blue link that says "Return to list of posts". Through this link you will be able to get to any unpublished stored posts or edit any existing posts.
Later, you will be able to install a "search this blog" widget if you found that feature of the navbar useful for your blog. I will show you how to do it in a future post.
You will still even be able to flag blogs if you happen to run across an objectionable blogspot blog, even if they have their navbar disabled! I will also describe that process in a future post.
In other words, you will not loose any important capabilities by disabling the navbar, only the ability to navigate through blogs via "Next Blog".
So now, let's get started to disable the navbar and keep those nasty blogs from landing in our lap.
First, click on an edit pencil or go to Dashboard and then the "Customize" link that is in upper left-hand bar of the Dashboard page.
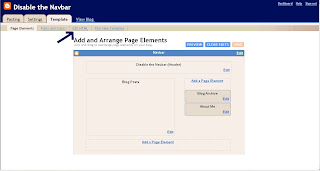
We want to get to the "Template" tab. You will see the Page Elements page as pictured below.
From here you will click on "Edit HTML".
Template page:.jpg)
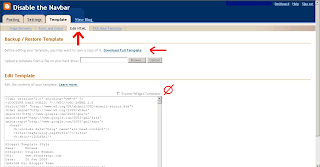
Below is the "Edit HTML" page. But first, for safety, click on the "download full template" button and save it in your computer as you are prompted. Call it something like, myblognamePREnavbardisable.html (or.xml whatever your program allows.).jpg)
Now, this is the piece of code that you will be entering that will hide the navbar:
#navbar-iframe {height:0px;visibility:hidden;display:none}
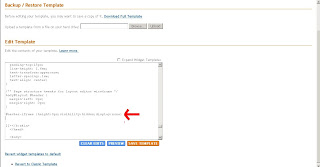
Below are two snapshots of the page showing where the code will go.
The red arrow points to the code that you will be inserting.
You can copy and paste it into the proper position.
To get to the proper position in the existing template code, you must scroll down the window that contains the code without expanding the widgets. (Don't check the "expand widgets box")
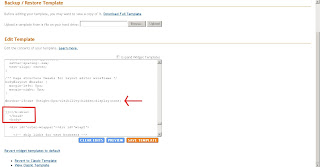
You will scroll about 4/5 the way down until you see the cluster of tags that I have squared off in red. These are part of the code already in your template.
Look closely for them as you scroll. When you find them, insert your magic line of code just above the /b:skin
.jpg)
.jpg)
Now click "Save Template". Once again, you should "download full template" and save it in the same place on your computer that you saved the first template download. You should name it the same except with AFTERnavbardisable in the title.
Publish and view your blog. Your navbar is gone!! Now you can safely have your kids and friends visit your great labor of love.
Happy blogging!
First, click on an edit pencil or go to Dashboard and then the "Customize" link that is in upper left-hand bar of the Dashboard page.
We want to get to the "Template" tab. You will see the Page Elements page as pictured below.
From here you will click on "Edit HTML".
Template page:
.jpg)
Below is the "Edit HTML" page. But first, for safety, click on the "download full template" button and save it in your computer as you are prompted. Call it something like, myblognamePREnavbardisable.html (or.xml whatever your program allows.)
.jpg)
Now, this is the piece of code that you will be entering that will hide the navbar:
#navbar-iframe {height:0px;visibility:hidden;display:none}
Below are two snapshots of the page showing where the code will go.
The red arrow points to the code that you will be inserting.
You can copy and paste it into the proper position.
To get to the proper position in the existing template code, you must scroll down the window that contains the code without expanding the widgets. (Don't check the "expand widgets box")
You will scroll about 4/5 the way down until you see the cluster of tags that I have squared off in red. These are part of the code already in your template.
Look closely for them as you scroll. When you find them, insert your magic line of code just above the /b:skin
.jpg)
.jpg)
Now click "Save Template". Once again, you should "download full template" and save it in the same place on your computer that you saved the first template download. You should name it the same except with AFTERnavbardisable in the title.
Publish and view your blog. Your navbar is gone!! Now you can safely have your kids and friends visit your great labor of love.
Happy blogging!
Disable the Navigation Bar: About Me
Welcome, to my blog. I will tell you how to disable the "next blog" button by disabling the navigation bar.
I decided to create this blog when I could not get Blogger to respond to the problem of its being hijacked by a giant borg of cloned porn sites.
These sites use a stealth, guerilla marketing technique that is unethical and probably illegal and definitely against the TOS (Terms of Service) of Blogger.
I found that I could no longer tell friends about my blog that I had worked so hard to create because of the "next blog" button in the navigation bar. It was generating a landing porn site at least 80% of the time.
I searched for info about this. I emailed and submitted suggestions. I could find no recent information on any "Help" or group discussion blogger sites.
I created a post in the group discussion and it was never answered.
I found at least one site by reading old postings: "Blogger Status for Real", that explained how to disable the navigation bar to prevent young children from inadvertently landing on one of these objectionable pages.
It took me so long to find that site that I felt I would start this blog to make it easy for people to find information on how to disable the navbar when they googled the term.
Hopefully folks who have family sites, religious sites, work sites, business sites or personal sites will be able to disable the navigation bar while they decide to move to another hosting service.
I do not think that Blogger/Google can or will fix this problem in the near future.
Subscribe to:
Comments (Atom)